Door weatherstripping seals gaps around exterior and interior doors to stop drafts, water, dust, and noise while improving energy efficiency and comfort. This article explores why weatherstripping matters, compares common materials and profiles, guides selection and measurement, shows installation and maintenance best practices, and helps troubleshoot problems so readers can choose the right solution for lasting performance.
Why door weatherstripping matters
Door weatherstripping is one of the simplest yet most effective upgrades you can make to improve the comfort and performance of any building envelope. At its core, door weatherstripping refers to the set of flexible strips, seals, or gaskets installed along the edges of doors to fill gaps where air, water, and sound might otherwise pass. While automotive weatherstripping shares similar goals, this chapter focuses specifically on weatherstripping for door installations in residential, commercial, or institutional buildings.
The primary objectives of door weatherstripping are clear: to create an effective barrier against external elements—including cold and hot air, moisture, dust, and pests—while ensuring that the door can still open and close smoothly. By sealing the tiny but consequential gaps that form between the door slab and frame, and at the threshold, weatherstripping for door applications directly influences the indoor environment in several fundamental ways.
Poorly sealed doors result in a cascade of practical issues. Drafts from outside can chill rooms in winter and overwhelm air conditioning in the summer, causing heat loss or gain that your HVAC system must constantly offset. These leaks force mechanical equipment to work harder, raising utility bills and accelerating wear. Moisture intrusion—whether from driving rain or humid air—can lead to warped wood, mold growth, or corrosion. Gaps also invite insects and rodents into your home or building, compromising sanitation and comfort. Perhaps just as disruptive, unwanted noise from traffic, neighbors, or industry enters through poorly sealed doors, reducing privacy and peace.
On the flip side, well-installed door weatherstripping brings measurable, building-wide benefits. Most notably, it helps stabilize indoor temperatures and humidity, making living and working spaces significantly more comfortable. Because energy losses through doors can account for up to 10–20% of a building’s heat exchange according to basic building science, proper weatherstripping for door applications gives a quick return on investment by lowering heating and cooling costs. This reduced energy demand also eases the burden on your HVAC equipment, potentially extending its service life. Additionally, door weatherstripping can muffle street noise, block pollen or dust, and prevent water-related damage to floors and finishes—all of which contribute to a longer lifespan for both doors and surrounding materials.
Common symptoms of failing door weatherstripping:
- Noticeable drafts around closed doors
- Light visible around the door edges
- Rattling, loose, or cracked seals on inspection
- Evidence of water stains, condensation, or mold near door edges
- Increased noise from outside, or more dust entry
Direct benefits to building owners and managers:
- Improved indoor comfort and consistent temperatures
- Lowered energy bills through reduced heat/cool loss
- Better noise control and privacy
- Reduced risk of moisture damage or mold
- Less frequent pest issues and allergen entry
- Prolonged door and frame life, minimizing repair expenses
With a firm understanding of why door weatherstripping matters, let’s now explore the broad array of materials and profiles available—and how to match the right solution to your door, climate, and performance needs.
Types of weatherstripping materials and profiles
Adhesive-Backed Foam Tape
Description: Flexible foam strip with a peel-and-stick adhesive backing.
Applications: Fast solution for wood and metal exterior doors, especially around jambs.
- Pros: Affordable, easy to install, fits irregular surfaces, good for renters.
- Cons: Limited durability (degrades with abrasion or UV), easily displaced.
- Durability: Low (1-2 years typical).
- Performance Traits: Excellent initial compression; modest rebound; fair for noise but limited against water; not great for large gaps.
- Failure Modes: Flattening, adhesive failure, crumbling.
- Best Climate/Door Types: Mild to moderate climates, minimal exposure; avoid with frequently repainted or uneven doors.
Felt Strips
Description: Woven or pressed textile strip, stapled or glued in place.
Applications: Low-cost traditional option for older wood exterior or interior doors.
- Pros: Inexpensive, low-profile, easy for tight clearances.
- Cons: Weak against moisture, compresses quickly, little noise control.
- Durability: Low.
- Performance Traits: Minor compression; poor rebound; minimal water/shedding; blocks only fine drafts.
- Failure Modes: Matting, rot, insect damage.
- Best Climates/Door Types: Dry, low-traffic interiors; not for high-humidity locations.
V-Strip (Tension Seal)
Description: Thin, flexible metal or plastic strip bent into a “V” shape to press against door edge.
Applications: Great for hinge and jamb sides of both wood and metal exterior doors and casement doors.
- Pros: Flexible, handles uneven gaps, moderate sealing, resists constant compression.
- Cons: Some visibility, can catch paint, trickier to install on irregular frames.
- Durability: Medium to high for metal, medium for vinyl.
- Performance Traits: Good compression/rebound, fair at blocking water and noise, excels at long narrow gaps.
- Failure Modes: Metal fatigue, cracking, loosening from fasteners.
- Best Climates/Door Types: All climates, especially when paint and clearance are not issues.
Tubular Rubber & Pile Gaskets
Description: Hollow or solid rubber, silicone, or pile-fiber tubes affixed to frames.
Applications: Best for exterior doors (wood/metal) where tight airtight seal is vital—threshold and jambs.
- Pros: Strong air/water barrier, excellent noise block, resists age and UV (if silicone/EPDM).
- Cons: Requires snug, even mounting; poor match for highly uneven surfaces.
- Durability: Medium to high (EPDM/silicone best).
- Performance Traits: Superior compression, great rebound, blocks wind-driven rain, premium sound reduction.
- Failure Modes: Drying/cracking, eventual loss of shape.
- Best Climates/Door Types: All climates; not ideal for painted or warped old doors with large irregular gaps.
Bulb/Gasket Seals
Description: Foam or rubber bulb profile fitted to aluminum or plastic retainers.
Applications: Typically for new steel/exterior doors around jamb, or retrofit kits.
- Pros: High sealing strength, maintains shape, suits wide range of temperatures.
- Cons: May compress with extreme use, install requires specific retainer track widths.
- Durability: High (especially in EPDM/silicone).
- Performance Traits: Nearly airtight/watertight, good noise blocking, excellent rebound.
- Failure Modes: Hardening with age, tearing.
- Best Climates/Door Types: Severe weather, exterior doors; clearance needed for bulb height.
Door Sweeps: Brush vs. Vinyl
Description: Mounted to the bottom edge of door; uses either flexible vinyl or bristle brushes.
Applications: Crucial for threshold sealing—wood, steel, and fiberglass doors.
- Vinyl Pros: Strong seal, blocks water/drafts.
- Vinyl Cons: May harden in extreme cold, can drag on uneven floors.
- Brush Pros: Glides over uneven surfaces, allows airflow, good for interior/garage.
- Brush Cons: Weak on water and insect intrusion, wears quickly.
- Durability: Medium (vinyl), low-medium (brush).
- Performance Traits: Compression (vinyl), flexibility (brush); noise barrier (vinyl more so).
- Failure Modes: Tearing, bristle flattening, screw loosening.
- Best Climates/Door Types: Humid/rainy (vinyl); attached garages (brush); clearance critical.
Thresholds & Threshold-Mounted Gaskets
Description: Solid metal, wood, or composite strips—sometimes with built-in gasket or bump.
Applications: Exterior entry doors where threshold gap must be tightly sealed and accessible.
- Pros: Excellent barrier for drafts/rain, durable, suits ADA accessibility mods.
- Cons: More complex installation, careful fit required.
- Durability: High.
- Performance Traits: Strong compression, water shedding, noise blocking.
- Failure Modes: Warping, gasket compression, corrosion.
- Best Climates/Door Types: All climates, especially high-traffic exteriors.
EPDM & Silicone Rubber
Description: Synthetic rubbers (EPDM, silicone) used as gaskets or seals.
Applications: Premium exterior door weatherstripping; replaceable bulb, strip, or gasket types.
- Pros: Top-rated for UV, ozone, water, and temperature resistance.
- Cons: Slightly higher cost, more difficult on uneven historic doors.
- Durability: Very high (10+ years possible).
- Performance Traits: Best for compression/rebound, air/water/noise block, extreme climate stability.
- Failure Modes: Minimal; surface hardening after very long exposure.
- Best Climates/Door Types: Extreme cold/heat/UV; exterior doors needing long service intervals.
Metal (Bronze, Brass, Aluminum) Weatherstripping
Description: Interlocking or spring bronze strips tacked to doors/frames, sometimes paired with rubber inserts.
Applications: Historic restorations, high-end wood doors, classic homes.
- Pros: Very durable, maintains historical authenticity, excellent for precise fits.
- Cons: Labor-intensive install, not for irregular or new modern doors, more expensive.
- Durability: High (often decades).
- Performance Traits: Good compression (if installed well), moderate rebound, moisture-resistant; modest sound barrier.
- Failure Modes: Warping, corrosion in poor environments, loss of spring tension.
- Best Climates/Door Types: Stable climates, traditional homes; not for metal doors or uneven new frames.
General Selection Rules of Thumb:
- Match compression profile to actual measured gap size and shape.
- Use strongest materials (EPDM, silicone, metal) for harsh weather and long life.
- For painted, uneven, or irregular doors, prefer foam/V-seal for flexibility.
- Choose brush sweeps for uneven garage floors, vinyl for water exclusion.
- Vintage/historic doors require bronze/brass for compatibility and appearance.
- If in doubt, test with small sample before committing to a whole door.
- Avoid high-profile seals if door swing clearance is tight.
How to measure and choose the right weatherstripping for your door
Tools and Supplies:
- Tape measure (preferably metal for straight readings)
- Notepad and pen
- Flashlight
- paper test (for draft test)
Start with basic checks before measuring. Close your door, then use a flashlight or daylight to spot visible cracks around the edges. Next, attempt the paper test: shut a strip of paper in the door at various points (top, sides, bottom). If it slides out effortlessly, the seal there is poor and likely needs door weatherstripping.
Record measurements at four key points: top edge, hinge side, latch side, and threshold. For each, insert your tape measure between the door and the frame or threshold (with the door closed) to gauge the smallest and largest gap, typically in millimeters or inches. Note if the gap is consistent, or wider in some areas—for uneven gaps, plan for flexible or compressive weatherstripping for door seals.
Determine door swing clearance by opening and closing the door to see how much space exists between the door and its frame, floor, or threshold. This is crucial for thicker weatherstripping types such as compression gaskets and sweeps; oversized seals can prevent proper door closure.
Translating measurements into the right product:
- Measure each gap. (E.g., under-door gap 3/8″, side/top gaps 1/8″)
- Choose compression or tension profile for each section:
- Gaps up to 1/8″: V-strip (tension seal) or thin foam tape
- Gaps 1/8″ to 1/4″: tubular, bulb, or D-shaped compression gasket
- Bottom gaps (1/4″ to 3/4″): door sweep or threshold gasket
- Check door swing clearance to avoid interference with closing.
- Select material based on climate:
- Damp/cold: closed-cell foam, silicone, or EPDM
- Hot/dry: vinyl or EPDM
- High UV: prefer silicone or metal
- Estimate total length needed (sum all measured edges) and ensure you purchase enough, accounting for small errors or overlap. Collect proper fasteners as needed (adhesive, nails, or screws, depending on type).
Example: For a typical wood exterior door: bottom threshold gap is 1/2″ (choose a vinyl or brush door sweep); side/top gaps are 3/16″ (go with bulb compression gasket); door is painted and exposed to sun (prefer silicone versions for longevity). Budget by comparing prepackaged kits (may suit standard sizes), or buy longer rolls to cut precisely. Match the weatherstripping finish—white, brown, metallic—to complement your door color and hardware for a seamless, integrated look. This approach sets you up for a straightforward installation and ensures your door weatherstripping delivers reliable, attractive performance.
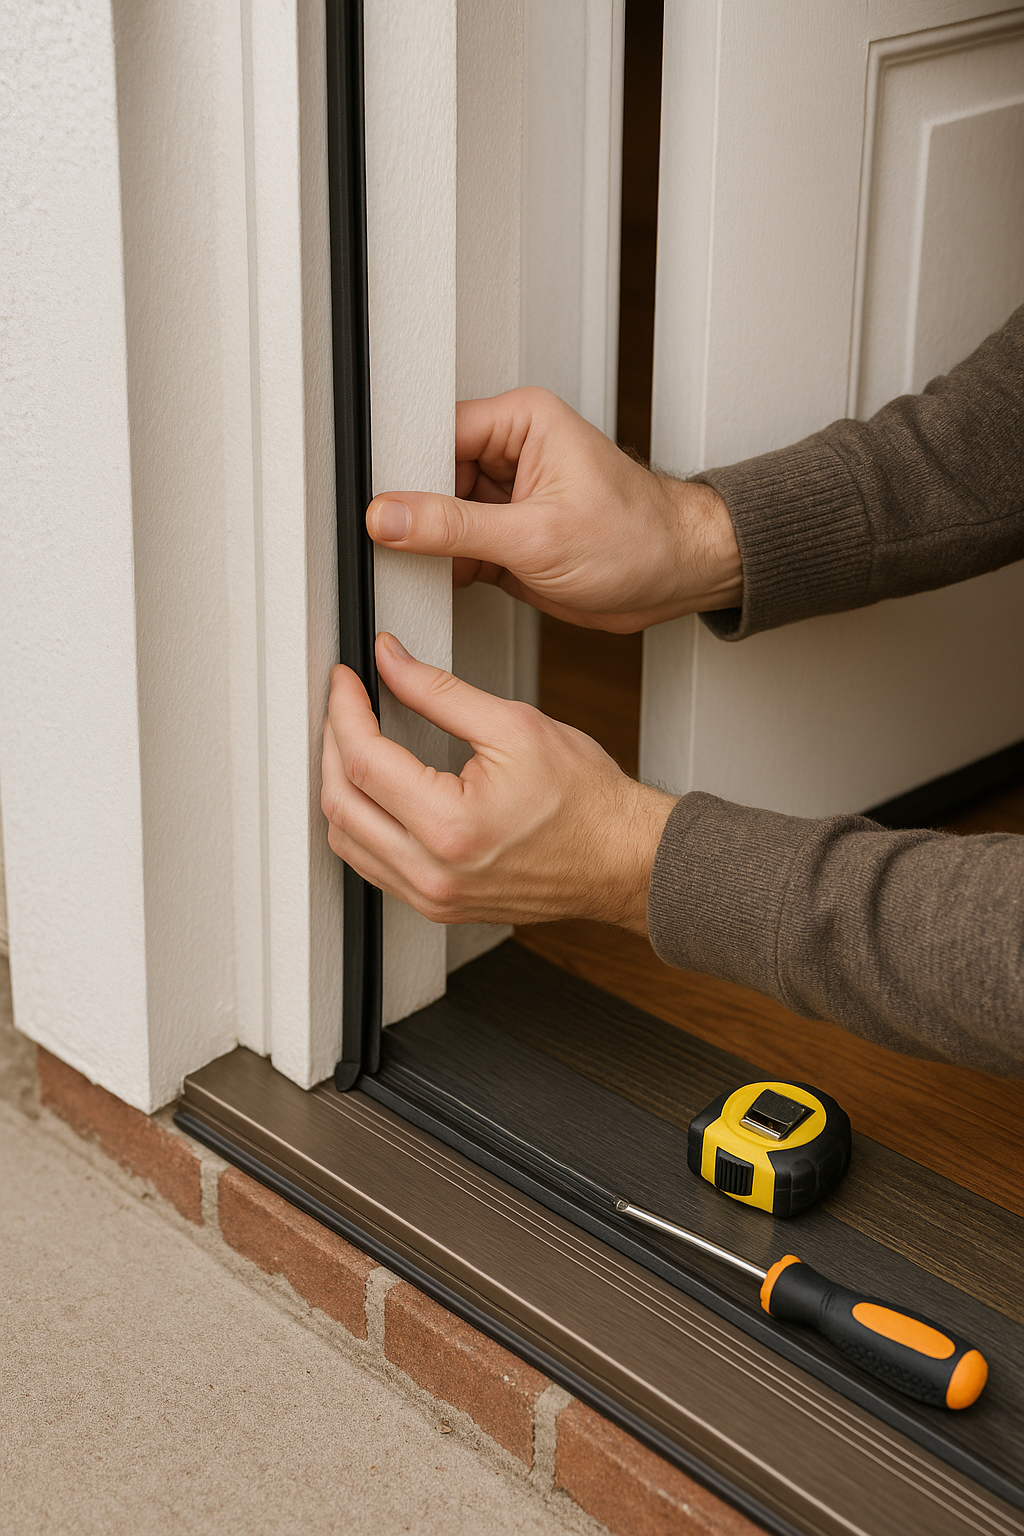
Installation steps and professional tips
Adhesive-Backed Foam Weatherstripping for Door
- Gather tools: Tape measure, utility knife or scissors, cleaning cloth, isopropyl alcohol, roller or plastic card.
- Surface prep: Wipe door stop and jamb with alcohol to remove dust, grease, and residue.
- Measure & cut: Measure each side precisely and cut foam tape 2-3 mm longer for compression at corners.
- Peel & stick: Position strip flush at jamb edge, peel adhesive backing in short sections, and press foam down while aligning.
- Set with pressure: Firmly press or roll with a plastic card to ensure full contact, especially in cool weather.
- Finish & test: Close door to ensure latch function and proper sealing; trim excess if the door sticks or doesn’t close easily.
- Troubleshooting tip: If foam pulls away, clean area again or use painter’s tape to reinforce until adhesive fully cures. For paint-sensitive surfaces, test adhesive on an inconspicuous spot.
V-Strip (Tension Seal)
- Gather tools: Tape measure, scissors, roller, small finish nails and hammer (for metal strip), or self-adhesive variety.
- Surface prep: Clean jambs and door edges thoroughly; dry fully.
- Measure & cut: Cut strips to fit along the length of the doorstop and hinge/latch sides.
- Attach: For adhesive types, press V-strip into the corner where jamb meets the stop. For metal V-strip, tack down every 6 inches.
- Check tension: Ensure strip forms a “V” toward the door; adjust for snug but not jamming fit.
- Troubleshooting tip: If door binds, loosen tension or recut. For uneven thresholds, adjust V-strip angle.
Bulb/Gasket & Tubular Seals
- Gather tools: Drill, screws, screwdriver, tape measure, pencil, scissors or snips.
- Layout: Mark placement along the doorstop perimeter for a continuous seal.
- Cut and fit: Cut seals to length; dry-fit before attachment for corner alignment.
- Attach: Pre-drill pilot holes. Secure with screws to avoid warping; compress seal slightly at corners for tight fit.
- Troubleshooting tip: Gasket too firm? Try softer profile. If seal gaps at corners, use short extra pieces.
Door Sweep
- Gather tools: Screwdriver, hacksaw, pencil, drill (optional).
- Prepare surface: Clean door bottom thoroughly; let dry.
- Measure & cut: Measure door width; hacksaw sweep to match (leave 1/8-inch clearance at edges).
- Mark & drill: Hold sweep in position; mark screw holes. Pre-drill if hardwood.
- Fasten: Screw sweep in lightly at first, test door swing, then fully tighten.
- Adjust: Ensure sweep barely brushes threshold—too tight causes drag, too loose allows drafts.
- Troubleshooting tip: If sweep jams, sand bottom edge. Use adjustable sweeps for uneven floors.
Threshold Gasket
- Gather tools: Hack saw, caulk gun, tape measure, utility knife, screwdriver, drill.
- Remove old gasket: Unscrew and pull out old gasket or threshold, clean thoroughly.
- Measure & cut: Cut new gasket to fit, dry fit to verify end-to-end contact.
- Seal and fasten: Apply bead of caulk for waterproofing, screw threshold or press gasket into track.
- Check seal: Close door and confirm full compression and latch engagement.
- Safety: Wear eye protection; use extreme care with utility knives and power tools. Protect finished door surfaces with painter’s tape while working.
When to Hire a Professional & Avoid Common Pitfalls
- Hire a pro if: Retrofits require cutting metal doors, involve complex sills/sill pans, or require integrated threshold weatherproofing.
- Pitfalls to Avoid:
- Skipping surface prep—adhesion will fail.
- Over-tightening sweeps—causes drag and wear.
- Failing to pre-drill screw holes—splits wood or cracks jambs.
- Using wrong profile—check fit before final attachment.
Maintenance troubleshooting and replacement indicators
- Inspect all door seals: Check the entire perimeter of each exterior door for signs of damage, gaps, or visible wear in door weatherstripping.
- Check for air leaks: Hold a lit incense stick or use the paper test around the edges to detect drafts.
- Look for moisture: Check the floor, threshold, and secured seal points for condensation or water marks.
- Evaluate tightness: Open and close the door, noting any unusual noises or resistance that can indicate misaligned weatherstripping for door seals.
- Inspect for pest ingress: Watch for signs that insects or rodents are entering near door sweeps or under the threshold.
Routine maintenance for door weatherstripping ensures efficient energy savings and long-term protection. Clean seals every season by wiping them with a damp cloth and mild soap, removing dust, pollen, or debris that could prevent a proper seal. Paint buildup over weatherstripping for door surfaces should be carefully removed with a plastic scraper or solvent compatible with the seal material. If the seals have become dry or squeaky, apply a silicone spray or the seal manufacturer’s recommended lubricant for flexible, noise-free performance.
Diagnostic approaches help pinpoint failing or underperforming door weatherstripping. The paper test is simple: close the door over a slip of paper; if it pulls free without resistance, the seal is likely compromised. Visual checks under strong light can expose gaps or flattened, cracked sections. Moisture tracing for condensation or staining at the sill indicates leaks that require addressing. For sound reduction, listen near closed doors during strong winds or high outdoor noise—any whistling or clear transmission signals deteriorated seals.
If you notice persistent drafts by the latch, inspect the strike plate and adjust alignment or replace the weatherstripping for door frame sections. Bottom drafts often trace to worn sweeps or thresholds—tighten or replace as needed. Squeaks usually respond to lubrication or repositioning the seal to prevent rubbing.
Replacement indicators include visible cracks, splits, tears, permanent compression, or flattening of the material. If repeated adjustments do not fix ongoing drafts or light infiltration, it’s time for a replacement. Door weatherstripping subjected to high UV, extreme temperature swings, or heavy foot traffic will break down faster—annual inspection is critical.
When replacing, dispose of old rubber or foam weatherstripping with household waste if recycling isn’t available locally; metal thresholds may be accepted by scrap recyclers.
- Is weatherstripping for doors covered by warranty? Many manufacturers offer 1–5 year warranties on defects—check your specific product packaging or website for details.
- How long should door weatherstripping last? Typical lifespan ranges from 3 to 8 years depending on use, exposure, and material quality.
Annual Maintenance Checklist for Door Weatherstripping:
- Visually inspect all door seals for cracks, gaps, and flattening
- Test for drafts and air leaks with the paper test or incense
- Clean all door weatherstripping with soap and water
- Remove paint buildup from contact surfaces
- Lubricate seals with silicone spray as needed
- Replace damaged or ineffective weatherstripping for door frames or thresholds
Conclusions
Door weatherstripping is a cost-effective upgrade that improves comfort, reduces energy waste, and protects interiors from moisture and noise. Choosing the right material and profile requires measuring gaps and matching performance to door type and climate. Proper installation, seasonal inspection, and timely replacement keep seals effective. Follow the guidance in this guide to select, install, and maintain weatherstripping for long-term savings and improved comfort.